Introduction
In this post, we’ll explore how to get started with SD-WAN automation. Whether you’re new to scripting or just beginning to explore what’s possible with the SD-WAN API, this guide will help you take your first steps. We’ll look at key concepts, practical examples, and the tools you need to start automating tasks and simplifying your network operations.
Why should you automate?
There are multiple examples where automation could bring huge benefits. Weather it is pushing changes quicker, minimizing risk, being more efficient with time, building custom tools, integrating with third party systems, automation will open the door to these and more ways to easily and efficiently manage the network.
Here are some use cases:
- Device Deployment - Automate VM deployment and bring up process based on predefined templates.
- Configuration Management - Push configs via API in seconds, instead of manually logging into each device, you can push configs via API in seconds.
- Monitoring and Alerting - Receive alerts when specific events happen on the network, build scripts to monitor exactly what you need.
- Integration with other systems - Enrich other Cisco or external systems with information shared directly from the SD-WAN Manager towards them.
- Health Checks - Verify your network is operating smoothly and under a desired state, constantly
- Augmenting Capabilities - Explore new technologies and experiment how they could be integrated to you day to day activities.
SD-WAN Manager REST APIs
At the heart of automation we have REST API (Representational State Transfer Application Programming Interface), which is a way for systems to talk to each other over HTTP, just like your browser does when it loads a web page.
In SD-WAN automation, the Manager REST API allows you to interact with your SD-WAN controller programmatically. Instead of clicking through the GUI, you can send HTTP requests to:
- GET information (list devices, get health stats)
- POST new configurations
- PUT updates to existing objects
- DELETE configurations you no longer need
Each request goes to a specific endpoint URL and include headers, authentication, and payloads.
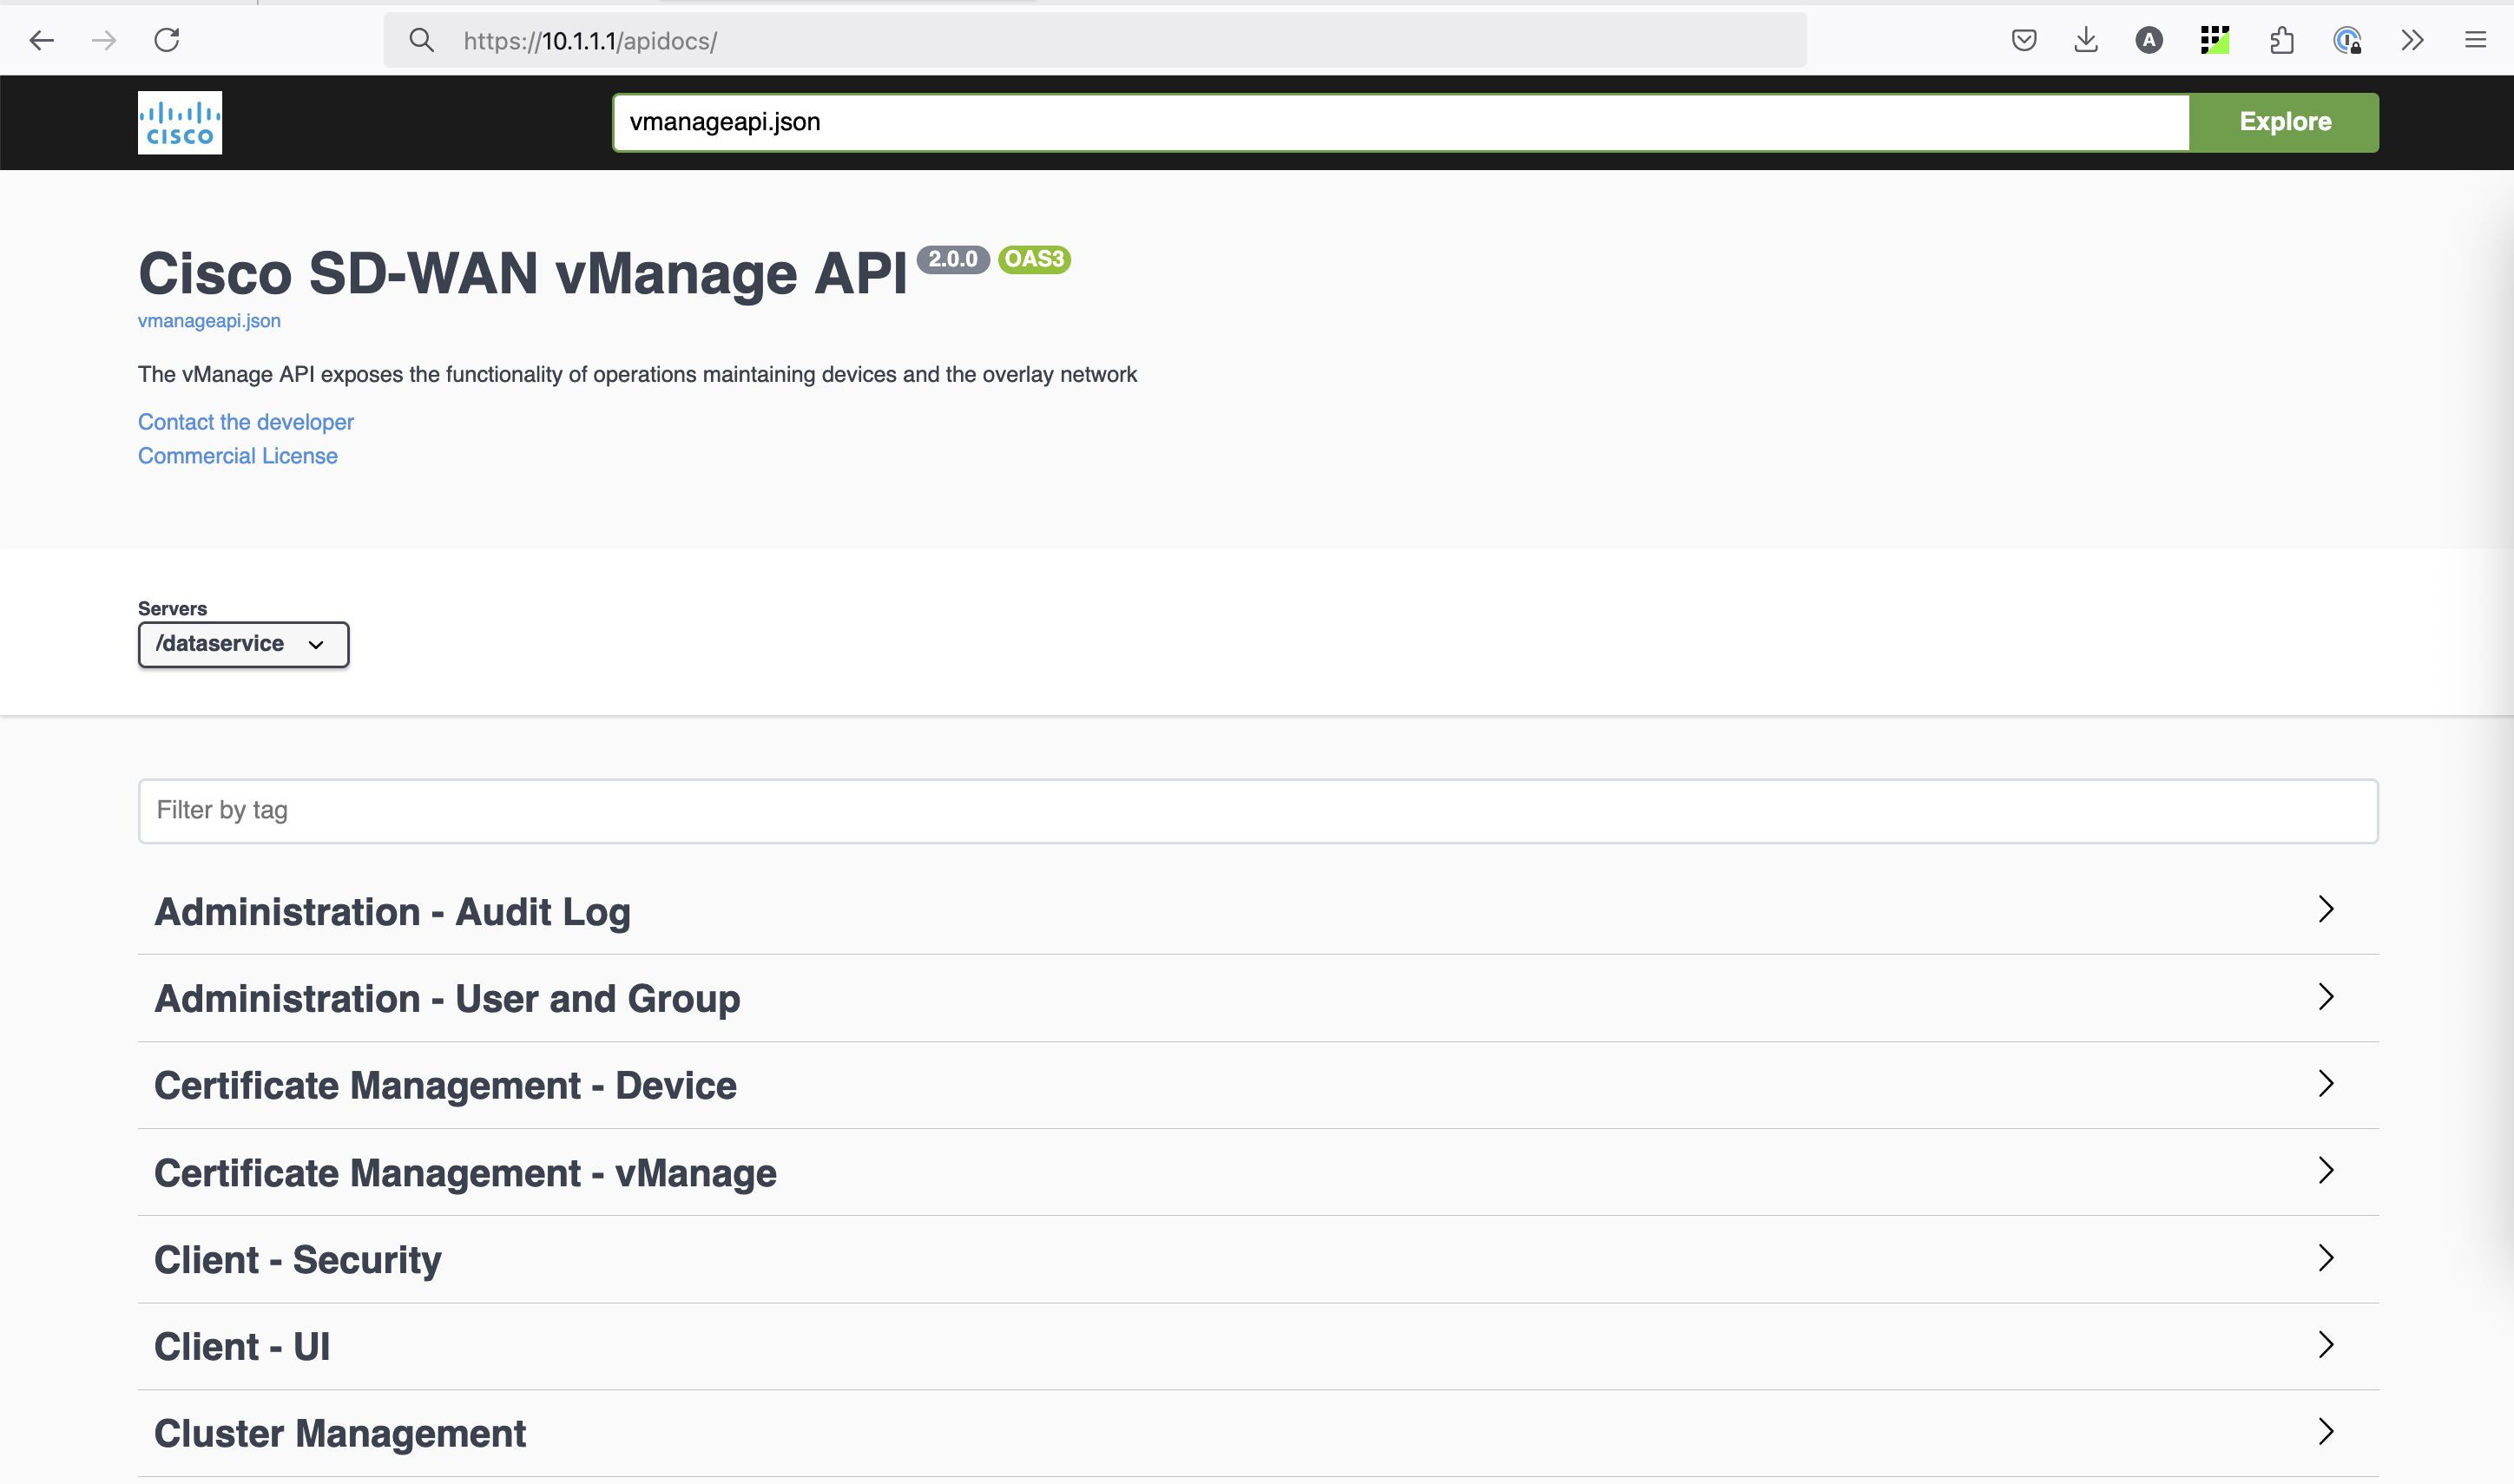
There is Cisco documentation about the API endpoints here. You can also check the in-product API documentation located at
https://vmanage-ip:port/apidocs
HTTP Status Codes
Let’s introduce the most common HTTP status codes, which will tell you how a request to a server went. Here are the most common:
200 OK – Everything worked perfectly.
301 Moved Permanently – The resource has a new URL.
400 Bad Request – The request was malformed.
401 Unauthorized – You need to log in.
403 Forbidden – You’re not allowed to access this.
404 Not Found – The resource doesn’t exist.
500 Internal Server Error – Something broke on the server.
503 Service Unavailable – Server is overloaded or down.
We expect to get HTTP 200 when we perform API calls.
Authentication
Getting a session ID (cookie)
The first thing needed to interact the with Manager is getting authenticated. Just in the same way we would do if we wanted to access it through the UI. For this, the following endpoint is needed:
POST https://{vmanage-ip-address}/j_security_check
Content-Type: application/x-www-form-urlencoded
HTTP Body: "j_username={admin}&j_password={credential}"
This is a POST operation, that needs the header Content-Type: application/x-www-form-urlencoded and expects a payload of “j_username={admin}&j_password={credential}”.
Let’s use curl to test it out. Note that when we use option –data , curl knows it should use POST method.
alex ~ % curl -v -k --location 'https://10.1.1.1:443/j_security_check' \
--header 'Content-Type: application/x-www-form-urlencoded' \
--data-urlencode 'j_username=netwithalex' \
--data-urlencode 'j_password=netwithalex'
*   Trying 10.1.1.1:443...
* Connected to 10.1.1.1 (10.1.1.1) port 443
...
* using HTTP/1.x
> POST /j_security_check HTTP/1.1
> Host: 10.1.1.1
> User-Agent: curl/8.7.1
> Accept: */*
> Content-Type: application/x-www-form-urlencoded
...
* upload completely sent off: 45 bytes
< HTTP/1.1 200 OK
< set-cookie: JSESSIONID=dEzBwsDlx-eMKye1xbXBgT7NZVfXRe1tJQZvkMLH.b387d75e92857dc1e41025f809f43b054a0d0aa8ebf50be8d2fc1aa2f87c90da; path=/; secure; HttpOnly
...
<
* Connection #0 to host 10.1.1.1 left intact
We need to save the set-cookie
JSESSIONID=dEzBwsDlx-eMKye1xbXBgT7NZVfXRe1tJQZvkMLH
and use it next to get a token.
Getting a token
An XSRF token (also called CSRF or Cross-Site Request Forgery token) is a security feature that helps protect a web application from unauthorized actions made by attackers.
The following endpoint is used to get a token:
GET https://{vmanage-ip-address}/dataservice/client/token
Content-Type: application/json
HTTP Header: "Cookie: JESSIONID={session hash id}"
This token in required mostly for POST operations, if you are doing GET operations you likely won’t need it. Consider this when building scripts that require POST actions.
alex ~ % curl -v -k --location 'https://10.1.1.1:443/dataservice/client/token' \
--header 'Content-Type: application/json' \
--header 'Cookie: JSESSIONID=dEzBwsDlx-eMKye1xbXBgT7NZVfXRe1tJQZvkMLH.b387d75e92857dc1e41025f809f43b054a0d0aa8ebf50be8d2fc1aa2f87c90da'
*   Trying 10.1.1.1:443...
* Connected to 10.1.1.1 (10.1.1.1) port 443
...
* using HTTP/1.x
> GET /dataservice/client/token HTTP/1.1
> Host: 10.1.1.1
> Accept: */*
> Content-Type: application/json
> Cookie: JSESSIONID=dEzBwsDlx-eMKye1xbXBgT7NZVfXRe1tJQZvkMLH.b387d75e92857dc1e41025f809f43b054a0d0aa8ebf50be8d2fc1aa2f87c90da
< HTTP/1.1 200 OK
...
< vary: Accept-Encoding
< content-type: application/json; charset=UTF-8
>
* Connection #0 to host 10.1.1.1 left intact
F1FE79CE079240E12A393B73F0EB5445F31BC456322F634EDEF8A9A7D5856A6FC7763D2C80D2253118917910502F20A9A1CA%
The token is shown at the very end
F1FE79CE079240E12A393B73F0EB5445F31BC456322F634EDEF8A9A7D5856A6FC7763D2C80D2253118917910502F20A9A1CA
We are ready to start interacting with the Manager
Examples
GET - Retrieving a device’s configuration
Let’s get the running configuration of one device with the following call
GET https://{{vmanage-ip}}:{{port}}/dataservice/template/config/running/{deviceId}
Content-Type: application/json
In this case, the deviceId is the chassis number, you can find it on the UI:
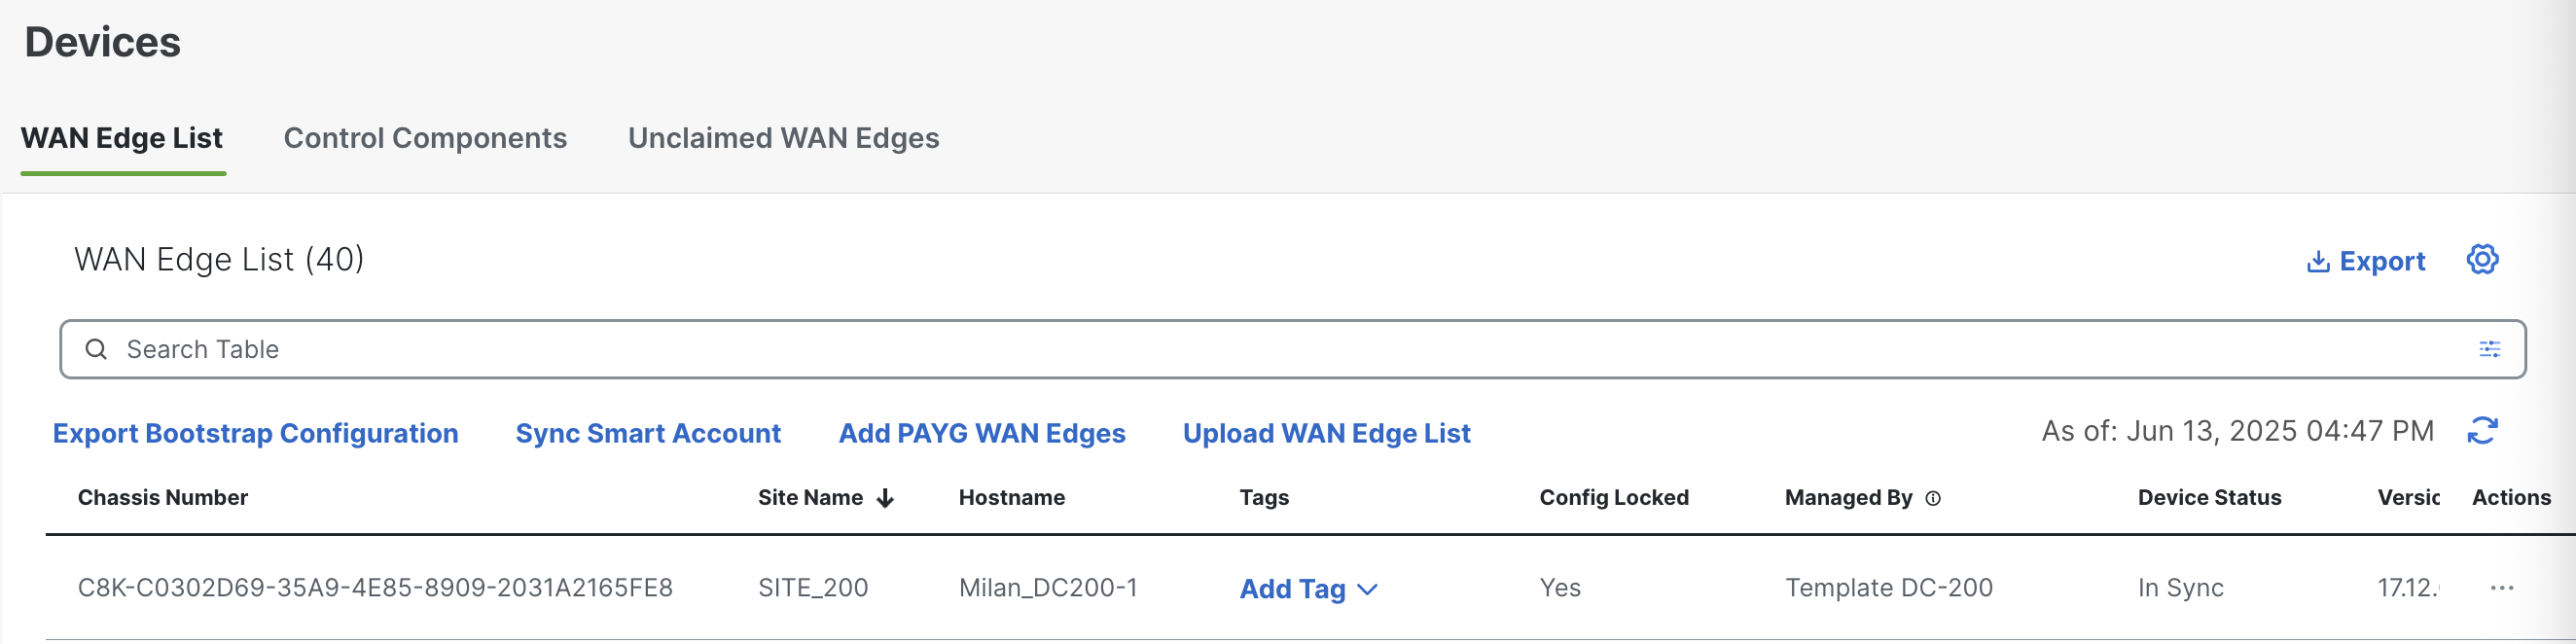
alex ~ % curl -k -v --location 'https://10.1.1.1:8443/dataservice/template/config/running/C8K-C0302D69-35A9-4E85-8909-2031A2165FE8' \
--header 'Content-Type: application/json' \
--header 'Cookie: JSESSIONID=dEzBwsDlx-eMKye1xbXBgT7NZVfXRe1tJQZvkMLH.b387d75e92857dc1e41025f809f43b054a0d0aa8ebf50be8d2fc1aa2f87c90da'
*   Trying 10.1.1.1:8443...
* Connected to 10.1.1.1 (10.1.1.1) port 8443
...
* using HTTP/1.x
> GET /dataservice/template/config/running/C8K-C0302D69-35A9-4E85-8909-2031A2165FE8 HTTP/1.1
> Host: 10.1.1.1:8443
> User-Agent: curl/8.7.1
> Accept: */*
> Content-Type: application/json
> Cookie: JSESSIONID=dEzBwsDlx-eMKye1xbXBgT7NZVfXRe1tJQZvkMLH.b387d75e92857dc1e41025f809f43b054a0d0aa8ebf50be8d2fc1aa2f87c90da
>
...
< vary: Accept-Encoding
< content-type: application/json; charset=UTF-8
< server: svcproxy
< transfer-encoding: chunked
<
{"config":" system\n system-ip             1.1.200.1\n overlay-id            1\n site-id               200\n no transport-gateway enable\n port-offset           0\n control-session-pps   300\n admin-tech-on-failure\n sp-organization-name  MYSDWAN-LAB123\n organization-name     MYSDWAN-LAB123\n port-hop\n track-transport\n track-default-gateway\n upgrade-confirm...}
The running config is returned inside the {}
POST - Creating a new User
Let’s do an easy POST operation to see how we need to pass the token.
We will use the following endpoint
POST https://{{vmanage-ip}}:{{port}}/dataservice/admin/user
Headers: "Content-Type: application/json", "accept: */*"
Payload = {
   "group":[
      "operator"
   ],
   "description":"Demo User",
   "userName":"apiUser",
   "password":"apiuser",
}
We need to specify the group, description, username and password.
Let’s do it with curl
alex ~ % curl -v -k --location 'https://10.1.1.1:8443/dataservice/admin/user' \
--header 'Content-Type: application/json' \
--header 'X-XSRF-TOKEN: F1FE79CE079240E12A393B73F0EB5445F31BC456322F634EDEF8A9A7D5856A6FC7763D2C80D2253118917910502F20A9A1CA' \
--header 'Cookie: JSESSIONID=dEzBwsDlx-eMKye1xbXBgT7NZVfXRe1tJQZvkMLH.b387d75e92857dc1e41025f809f43b054a0d0aa8ebf50be8d2fc1aa2f87c90da' \
--data '{
   "group":[
      "operator"
   ],
   "description":"API User",
   "userName":"apiuser",
   "password":"apiuser"
}'
*   Trying 10.1.1.1:8443...
* Connected to 10.1.1.1 (10.1.1.1) port 8443
...
> POST /dataservice/admin/user HTTP/1.1
> Host: 10.1.1.1:8443
> User-Agent: curl/8.7.1
> Accept: */*
> Content-Type: application/json
> X-XSRF-TOKEN: F1FE79CE079240E12A393B73F0EB5445F31BC456322F634EDEF8A9A7D5856A6FC7763D2C80D2253118917910502F20A9A1CA
> Cookie: JSESSIONID=dEzBwsDlx-eMKye1xbXBgT7NZVfXRe1tJQZvkMLH.b387d75e92857dc1e41025f809f43b054a0d0aa8ebf50be8d2fc1aa2f87c90da
> Content-Length: 117
>
...
* upload completely sent off: 117 bytes
< HTTP/1.1 200 OK
...
< vary: Accept-Encoding
< vmanagerequestid: 45dc1c76-8a00-48e4-80f0-fe9b2f2a894b
< x-content-type-options: nosniff
< strict-transport-security: max-age=31536000; includeSubDomains
< permissions-policy: geolocation=(self), microphone=(), camera=(), fullscreen=(self)
< content-type: application/octet-stream; charset=UTF-8
< server: svcproxy
< transfer-encoding: chunked
<
* Connection #0 to host 10.1.1.1 left intact
{}%
We received an HTTP 200 and an empty {} response, indicating the user was correctly created. Let’s check on the UI
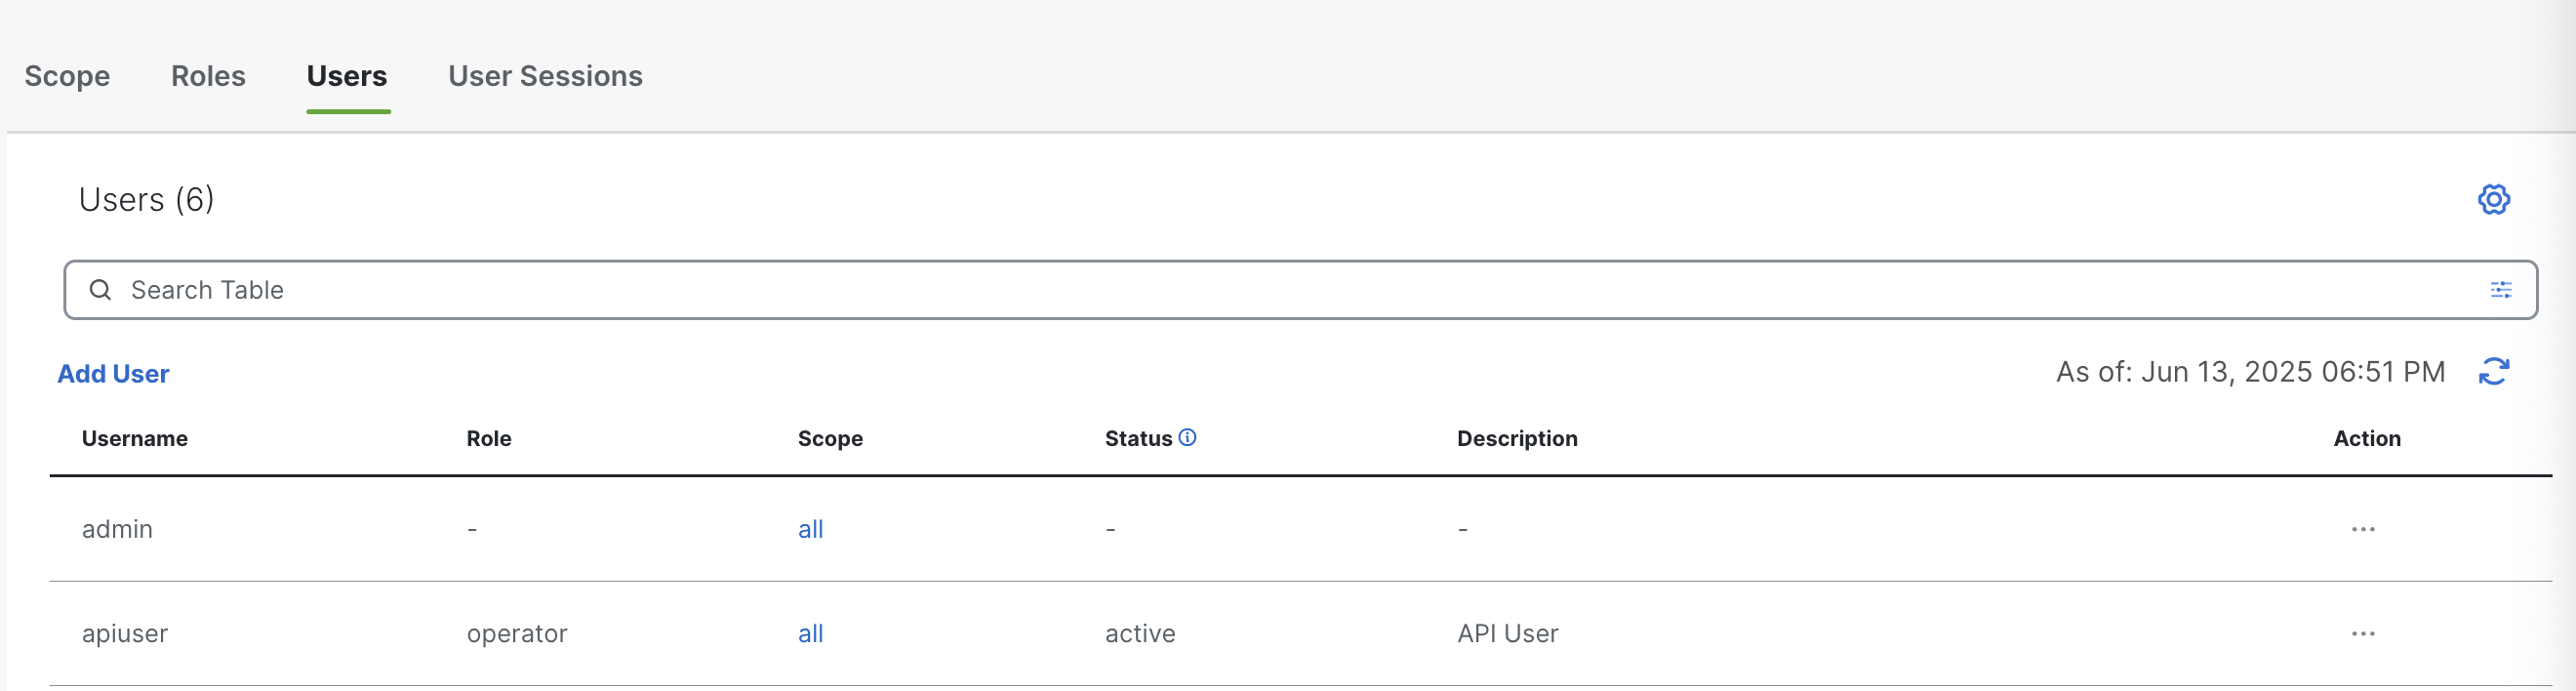
The apiuser was created successfully!
Conclusion
In this post, we covered the basics you need to start working with the SD-WAN Manager REST APIs — from understanding HTTP status codes to retrieving configurations and creating users. The examples used curl intentionally to help you see the raw structure of requests, understand headers, and learn how to work with cookies and the XSRF token.
Next, we’ll translate these concepts into Python and start automating real-world tasks step by step.